Overview
The process of configuring Cisco Catalyst 9300 Series Switches can be performed using either the Web User Interface (WebUI) or the Command Line Interface (CLI). Below is a summary of the steps involved in each method, including console access options and USB driver installation requirements.
Configuring the Switch Using the WebUI
To configure the switch via WebUI, users must refer to the appropriate version of the software configuration guide. The guide provides detailed instructions for setting up the switch through the graphical interface.
Configuring the Switch Using the CLI
Accessing the CLI
Accessing the CLI can be done through the switch's console port using an RJ-45 or USB connection. This requires a terminal emulation program like PuTTY or TeraTerm. Users can also configure entire switch stacks from any member switch within the stack.
Connecting the RJ-45 Console Port
To connect via RJ-45:
Attach the RJ-45-to-DB9 adapter cable between the switch console port and the PC’s serial port.
Launch a terminal emulation program and set communication parameters (9600 baud, 8 data bits, no parity, 1 stop bit, no flow control).
Power on the switch to display the bootloader sequence and the setup prompt.
Connecting the USB Console Port
For USB connections:
Identify the USB device type (Cisco USB or Silicon Labs USB) via Device Manager (Windows) or System Report (Mac).
Install the appropriate USB driver if required. Cisco drivers are available on Cisco’s website, while Silicon Labs drivers can be downloaded from their official site or via Windows Update.
After installing the driver, connect the USB cable to the PC and switch, launch a terminal emulation program, configure communication settings, and power on the switch to access the setup prompt.
USB Driver Installation for Windows PCs
Obtain the Cisco USB console driver or Silicon Labs driver.
Install the Cisco driver using the setup.exe file, following the InstallShield Wizard instructions.
For Silicon Labs, navigate to the Windows Update page, view optional updates, and download the relevant driver.
Once the driver is installed, reconnect the USB cable to verify the connection.
Uninstalling Cisco USB Drivers
To remove a Cisco USB driver, run the driver’s setup file, select the “Remove” option in the InstallShield Wizard, and follow the prompts to complete the uninstallation process.
These steps provide flexibility and ease for managing Cisco Catalyst 9300 Switches through various connection methods, ensuring efficient configuration and management.
Configuring the Switch Using the Web User Interface
For instructions on setting up the switch using the WebUI, refer to the required version of the software configuration guide. In the guide, go to .
Configuring the Switch Using the CLI
Accessing the CLI Through the Console Port
You can access the CLI on a configured or unconfigured switch by connecting the RJ-45 console port or USB console port of the switch to your PC or workstation and accessing the switch through a terminal emulation program.
 | If you have stacked your switches, connect to the console port of one of the switches in the stack. You can initially configure the entire stack from any member switch. |
Connecting the RJ45 Console Port
Procedure
| Step 1 | Connect the RJ45 port adapter to the serial port on the terminal server or your PC using the optional RJ45-to-DB9 adapter cable. Connect the other end of the cable to the switch console port. |
| Step 2 | Start the terminal-emulation program on the PC or the terminal. The program, frequently a PC application such as Putty or TeraTerm, makes communication between the switch and your PC or terminal possible. |
| Step 3 | Configure the baud rate and character format of the PC or terminal to match the console port default characteristics:9600 baud8 data bits1 stop bitNo parityNone (flow control) |
| Step 4 | Power on the switch. |
| Step 5 | The PC or terminal displays the bootloader sequence. Press Enter to display the setup prompt. |
Connecting the USB Console Port
Before you begin
The Cisco Catalyst 9300 Series Switches will either have the Cisco USB Device or Silicon Labs USB Device (CP2102N). To identify which USB device is in the switch, do the following:
- Connect a USB cable from the Windows-based PC or Mac-based PC to the USB console port.
- On the Windows-based PC, open the Device Manager or on the Mac-based PC, open the System Report and view the following:Type of USB DeviceDevice NameCisco USB deviceCisco USB Console or USB Serial DeviceSilicon Labs USB deviceSilicon Labs CP210x USB to UART Bridge or CP2102N USB to UART Bridge
Procedure
| Step 1 | To install the USB driver to a Windows-based PC or Mac-based PC for the first time, do the following:.Windows-based PCFor Cisco USB Device, see Installing the Microsoft Windows USB Device Driver.For Silicon Labs USB Device. you can either download the USB driver from the Silicon Labs website or see Installing the Silicon Labs Windows USB Device Driver.Mac-based PCFor Cisco USB Device, no driver installation is required.For Silicon Labs USB Device. you can download the USB driver from the Silicon Labs website. Once the installation is completed, a virtual COM port session, "tty.SLAB_USBtoUART", will be started. |
| Do not use the generic USB serial driver available on the Mac-based PC. | |
| USB Type A port on the switch provides file system support and is NOT a console port. See USB Type A Port section. | |
| Step 2 | Connect a USB cable to the PC USB port. Connect the other end of the cable to the switch mini-B (5-pin-connector) USB console port. |
| Step 3 | Start the terminal-emulation program on the PC or the terminal. The program, frequently a PC application such as Putty or TeraTerm, makes communication between the switch and your PC or terminal possible. |
| Step 4 | Configure the baud rate and character format of the PC or terminal to match the console port default characteristics:9600 baud8 data bits1 stop bitNo parityNone (flow control) |
| Step 5 | Power on the switch as described in the switch getting started guide. |
| Step 6 | The PC or terminal displays the bootloader sequence. Press Enter to display the setup prompt. Follow the steps in the Setup program. |
Installing the Microsoft Windows USB Device Driver
A USB device driver must be installed the first time a Microsoft Windows-based PC is connected to the USB console port on the switch.
- Installing the Cisco Microsoft Windows USB Driver
- Installing the Silicon Labs Windows USB Device Driver
Installing the Cisco Microsoft Windows USB Driver
Procedure
| Step 1 | Obtain the Cisco USB console driver file from the Cisco.com web site and unzip it.Windows 10 includes a USB to RS232 driver. However for added functionality, download the USB Console Software from the Software Download Center at cisco.com. |
| You can download the driver file from the Cisco.com site for downloading the switch software. | |
| Step 2 | If using 32-bit Windows, double-click the setup.exe file in the Windows_32 folder. If using 64-bit Windows, double-click the setup(x64).exe file in the Windows_64 folder. |
| Step 3 | The Cisco Virtual Com InstallShield Wizard begins. Click Next. |
| Step 4 | The Ready to Install the Program window appears. Click Install. |
| If a User Account Control warning appears, click Allow - I trust this program to proceed. | |
| Step 5 | The InstallShield Wizard Completed window appears. Click Finish. |
| Step 6 | Connect the USB cable to the PC and the switch console port. The USB console port LED turns green, and the Found New Hardware Wizard appears. Follow the instructions to complete the driver installation. |
Installing the Silicon Labs Windows USB Device Driver
Procedure
| Step 1 | Connect a USB cable to the PC USB port. Connect the other end of the cable to the switch mini-B (5-pin-connector) USB console port. |
| Step 2 | Launch the Windows Update page by clicking on the Update & Security button on the Windows Settings. |
| Step 3 | Click View optional updates. |
| Step 4 | Expand Driver updates and select Silicon Laboratories Inc. – Ports 10.x.x.x. |
| Step 5 | Click Download and install button.Once the driver installation is complete, disconnect the USB cable from the PC USB port and the switch. |
| Windows assigns different COM ports to Silicon Labs USB device. To view the COM port assignment, see Device Manager. |
Uninstalling the Cisco Microsoft Windows USB Driver
- Uninstalling the Cisco Microsoft Windows USB Driver
Uninstalling the Cisco Microsoft Windows USB Driver
Before you begin
Disconnect the switch console terminal before uninstalling the driver.
Procedure
| Step 1 | Run setup.exe for Windows 32-bit or setup(x64).exe for Windows-64bit. Click Next. |
| Step 2 | The InstallShield Wizard for Cisco Virtual Com appears. Click Next. |
| Step 3 | When the Program Maintenance window appears, select the Remove radio button. Click Next. |
| Step 4 | When the Remove the Program window appears, click Remove. |
| If a User Account Control warning appears, click Allow - I trust this program to proceed. | |
| Step 5 | When the InstallShield Wizard Completed window appears, click Finish. |
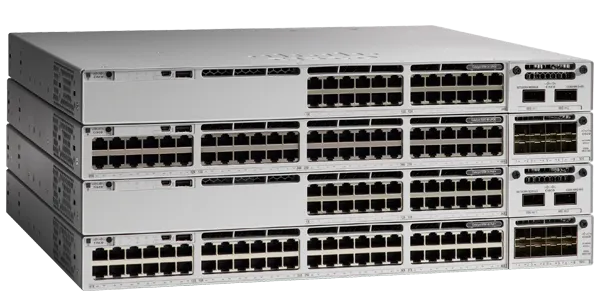
Cisco Catalyst 9300 Series Switches
Cisco All Series Switches New and Refurbished
For Cisco product list and quote, please visit: https://www.hi-network.com/categories/cisco or contact us at www.hi-network.com (Email: [email protected])